What to Check When Your Thermostat Is Not Responding to AC Settings
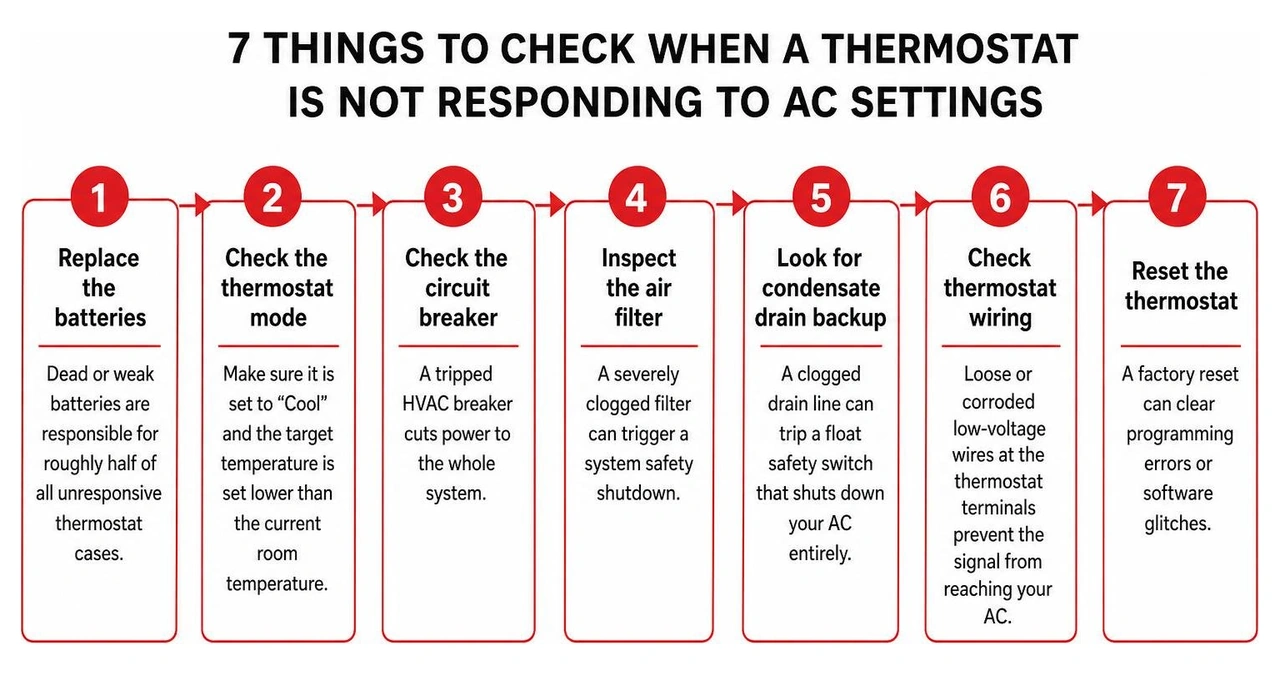
If your thermostat not responding to AC settings is leaving you with a hot house in the middle of an Antelope Valley summer, here are the most common things to check right now:
- Replace the batteries - Dead or weak batteries are responsible for roughly half of all unresponsive thermostat cases.
- Check the thermostat mode - Make sure it is set to "Cool" and the target temperature is set lower than the current room temperature.
- Check the circuit breaker - A tripped HVAC breaker cuts power to the whole system.
- Inspect the air filter - A severely clogged filter can trigger a system safety shutdown.
- Look for condensate drain backup - A clogged drain line can trip a float safety switch that shuts down your AC entirely.
- Check thermostat wiring - Loose or corroded low-voltage wires at the thermostat terminals prevent the signal from reaching your AC.
- Reset the thermostat - A factory reset can clear programming errors or software glitches.
Here is the frustrating reality many Antelope Valley homeowners run into: your thermostat screen looks perfectly fine. The temperature is displaying. You lower the setpoint. And nothing happens. The AC just does not turn on. It is easy to assume the thermostat itself is broken — but most of the time, the thermostat is simply the first visible sign of a problem happening somewhere else in your HVAC system, whether that is a blown fuse, a safety switch trip, a power issue, or a wiring fault. Before spending money on a replacement or a service call, there are several straightforward checks you can do yourself to narrow down exactly what is going wrong.
Explore more about thermostat not responding to ac settings what to check:
- AC troubleshooting before calling a pro
- AC not cooling but running what to check first
- Circuit breaker tripping when AC turns on what to do
Why Is My Thermostat Display Working But the AC Won't Turn On?
It is one of the most misleading scenarios in home maintenance. You walk up to your thermostat, and the digital display is perfectly bright. It shows the current temperature is 82°F, and you have set it to 74°F. Yet, your home remains a sweltering desert. Why does this happen?
The secret lies in how your thermostat receives and distributes power. Your thermostat actually uses two different power sources to do its job. The screen itself is often powered by local batteries (like AA or AAA) or a steady stream of 24-volt power from your indoor HVAC unit's transformer. However, sending a physical "call for cooling" to your outdoor air conditioner requires a complete low-voltage electrical circuit.
If there is a break in that circuit—such as a blown 3-amp or 5-amp fuse on your indoor air handler’s control board, a loose wire, or an active safety shutdown—the thermostat will continue to display the temperature, but it cannot physically signal the AC to turn on. Think of it like a smartphone that is fully charged but has no cellular service; the screen works, but you cannot make a call.
When your thermostat is powered up but the cooling refuses to kick in, it is highly beneficial to understand how to trace the issue. For a deeper look into these specific control issues, check out our guide on AC Thermostat Troubleshooting in Lancaster.
Thermostat Not Responding to AC Settings What to Check to Rule Out AC Unit Failure
Before you blame your thermostat, you must determine if the problem is actually a safety shutdown or mechanical failure within the air conditioner itself.
Modern air conditioning systems are built with multiple protective switches designed to shut the system down before expensive components, like the compressor, suffer permanent damage. If one of these safety switches is triggered, it cuts the 24V control signal. To you, it looks like the thermostat is ignoring your settings, but in reality, the AC is in a self-protective lockout.
To rule out a complete AC unit failure, check the following:
- The Outdoor Fan and Compressor: Step outside and listen to your condenser unit. Is it completely silent, or is it humming without the fan spinning? A humming outdoor unit with a stationary fan often points to a failed capacitor or contactor rather than a thermostat issue. You can read more about these electrical components in our article on AC Contactor Failure Symptoms and What Causes It.
- The Indoor Blower: Go to your thermostat and switch the fan setting from "Auto" to "On." If the indoor blower fan immediately starts blowing air out of your registers, your indoor unit has power, and the thermostat is successfully communicating with the blower. If nothing happens, you may have a broader power issue or a dead blower motor. For more details, check out our solutions for AC Fan Problems Solutions.
- Warm Air vs. No Air: If the system turns on and blows air, but the air is not cold, the thermostat is communicating, but the cooling cycle is failing. Learn more about this scenario in our guide on AC Not Cooling But Running What to Check First.
Thermostat Not Responding to AC Settings What to Check First
When troubleshooting, we always recommend starting with the easiest, least invasive checks. You would be surprised how many emergency service calls in the Antelope Valley are resolved simply by flipping a switch or changing a setting that was accidentally bumped.
Taking a few minutes to play detective can save you time and frustration. If you want a quick overview of what to look at before picking up the phone, our checklist on AC Troubleshooting Before Calling a Pro is an excellent place to start.
Checking Thermostat Settings and Modes
It sounds incredibly simple, but the very first thing to check is the basic programming and mode selection on your thermostat.
- System Mode: Ensure the system is explicitly set to "Cool." During seasonal transitions, it is easy to leave the system in "Heat" or "Off."
- The Temperature Setpoint: The target temperature must be set at least 3 to 5 degrees below the current room temperature to trigger a cooling cycle. If the room is 78°F and you set the thermostat to 77°F, it may not trigger immediately due to the system's built-in temperature differential.
- Fan Setting: Switch your fan from "On" to "Auto." When the fan is set to "On," the indoor blower runs continuously, even when the outdoor compressor is off. This can blow warm, unconditioned air into your home, making it feel like the AC is broken when it is actually just in between cooling cycles.
- Active Schedules and Eco Modes: If you use a smart thermostat, check to see if it has entered "Recovery Mode" or an "Eco/Away" mode. Recovery mode means the thermostat is slowly transitioning the home back to a programmed temperature after an energy-saving period. It might look unresponsive, but it is actually working through a programmed delay.
- Compressor Delay: Most modern digital thermostats have a built-in anti-short-cycle delay (usually 5 minutes). If you just turned the system off and on quickly, the thermostat will deliberately wait to protect the compressor from electrical damage. Give it ten minutes before assuming it is not working.
The Role of Thermostat Batteries in Communication Failures
Many homeowners do not realize that even if their digital thermostat is hardwired to the home's electrical system, it often still relies on backup batteries to function properly.
As batteries age and lose their charge, they can cause bizarre communication errors. A weak battery might have just enough voltage to power the low-draw liquid crystal display (LCD) screen, but lack the power to close the internal physical relay that sends the 24V signal down the wire to your air conditioner.
If your batteries are dying, the thermostat might look perfectly normal, but its "calls" for air conditioning will never reach the indoor or outdoor units. We recommend replacing your thermostat batteries once a year—a great rule of thumb is to do this at the same time you change your smoke detector batteries.
5 Steps to Troubleshoot a Thermostat Not Responding to AC Settings
If you have verified the basic settings and the AC still refuses to budge, it is time to perform a systematic, step-by-step diagnostic. Follow these five steps to isolate and resolve the issue.
Step 1: Inspect and Replace the Thermostat Batteries
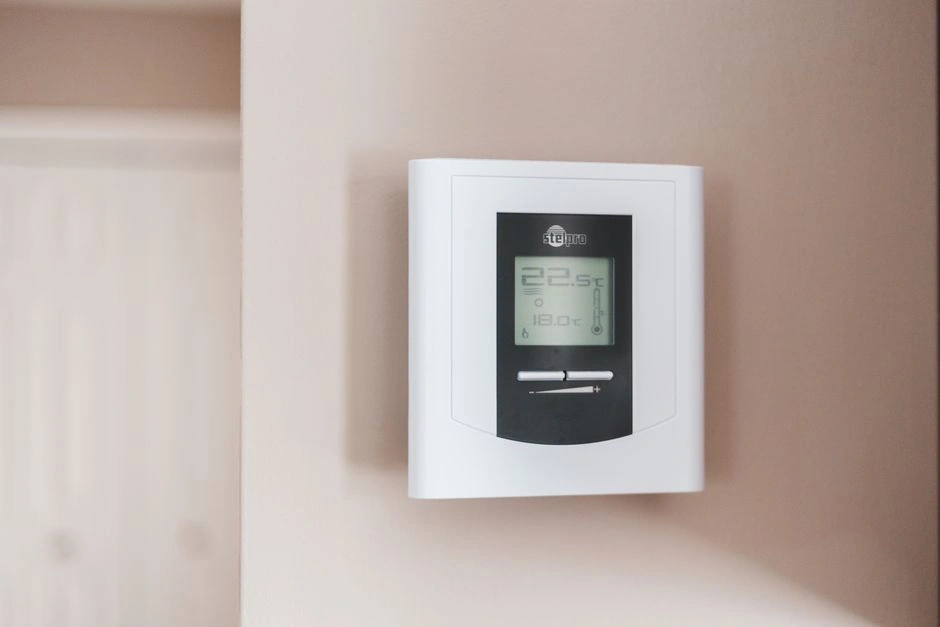
Since weak batteries are the single most common cause of communication failure, this is your starting point.
- Remove the Faceplate: Gently pull the thermostat body away from its wall-mounting plate. Most modern thermostats click into place and can be removed with a firm, straight pull. If it does not budge, look for a small screw on the bottom or side securing it.
- Locate the Batteries: Turn the faceplate over. You will typically find two AA or AAA batteries nested in the back.
- Replace with Fresh Batteries: Remove the old batteries and install a brand-new matching set of high-quality alkaline batteries. Avoid using rechargeable or cheap heavy-duty batteries, as they do not provide the consistent voltage required by digital thermostats.
- Reinstall and Test: Push the faceplate back onto the wall bracket. Wait a minute for the unit to boot up, set the mode to "Cool," and lower the temperature. Listen for a soft clicking sound from the thermostat, which indicates the internal relay has closed to start the AC.
Step 2: Check for a Tripped Breaker or Power Issue
Your air conditioner runs on high-voltage electricity, and it uses two separate circuits: one for the indoor air handler or furnace, and one for the outdoor condenser unit. If either of these breakers trips, your system will not run, and your thermostat may lose its connection.
- Locate Your Electrical Panel: This is usually found in a garage, hallway, or on the exterior of your home.
- Look for Tripped Breakers: Scan the switches for breakers labeled "AC," "Air Conditioner," "Furnace," or "HVAC." A tripped breaker will not be fully in the "On" position; it will usually be resting in the middle or showing a red indicator.
- Reset the Breaker: To reset a tripped breaker, you must flip it completely to the "Off" position first, and then flip it firmly back to "On."
- Wait 30 Minutes: If you reset the breaker, wait about 30 minutes before turning the thermostat back on. This allows any minor ice on the coils to melt and gives the system's internal circuit boards time to safely reboot.
Safety Note: If the breaker immediately trips again the moment the AC tries to start, do not attempt to reset it again. This indicates a severe electrical short or a failing compressor. Repeatedly resetting a tripping breaker can cause electrical fires or destroy your equipment. If this happens, it is a clear sign you need professional assistance. Read more about this emergency scenario in our guide on Circuit Breaker Tripping When AC Turns On What to Do.
Step 3: Examine the Air Filter and Condensate Drain Line
It might seem strange that a plumbing or airflow issue can make your thermostat seem unresponsive, but your HVAC system is highly interconnected.
If your indoor air filter is completely caked in dust and pet dander, it restricts airflow across your evaporator coil. This lack of airflow causes the coil's temperature to plummet, leading to frozen copper lines and a frozen coil. When the system overheats or freezes, internal limit switches will shut down the system's control power to prevent compressor failure. If your system is cycling rapidly before shutting down, you can learn more by reading AC Keeps Turning On and Off What Is Wrong.
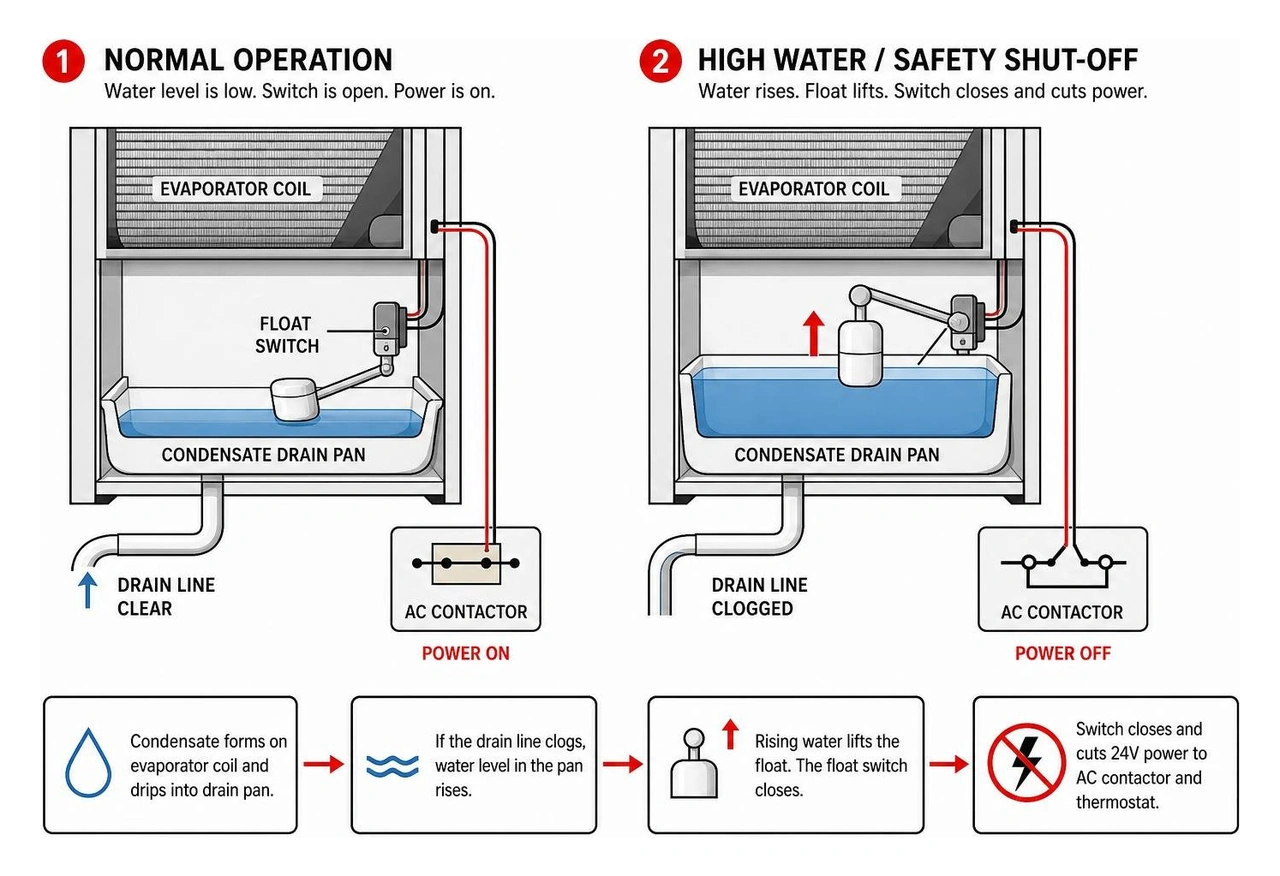
Additionally, your AC pulls incredible amounts of moisture out of the dry Antelope Valley air as it cools. This water drips into a condensate pan and drains away. If algae, dust, or dirt clogs that drain line, the pan will fill with water. To prevent a catastrophic indoor flood, modern systems are equipped with a condensate float switch.
When the water in the pan rises, the float switch trips and immediately cuts the 24V power to your thermostat or your AC contactor. To you, the thermostat suddenly appears completely unresponsive or dead, but it is actually a safety device saving your ceilings from water damage. Clear the drain line using a wet-dry vacuum on the outdoor drain pipe to restore operation.
Step 4: Inspect Thermostat Wiring for Loose Connections
Over time, daily vibrations or accidental bumps can cause the tiny low-voltage wires behind your thermostat to work themselves loose from their terminal screws. Corroded copper can also break the electrical connection.
- Turn Off the Power: Before touching any wiring, turn off the breakers to both your indoor furnace/air handler and your outdoor AC unit.
- Remove the Thermostat Casing: Expose the backplate attached to the wall.
- Inspect the Wires: You will see several small, colored wires connected to lettered terminals (R, Y, G, W, C).
- R (or Rc): Red wire, provides the 24V power.
- Y: Yellow wire, controls the cooling system.
- G: Green wire, controls the indoor fan.
- C: Blue or black wire, the "Common" wire that provides continuous power to smart thermostats.
- Check for Tightness: Gently wiggle each wire to ensure it is firmly secured in its terminal. If a wire is loose, use a small screwdriver to tighten the terminal screw. If a wire is broken or heavily corroded, strip the wire back to expose clean copper and reinsert it.
Step 5: Reset and Calibrate the Thermostat
Sometimes, a digital or smart thermostat simply experiences a software glitch, much like a computer or router. A hard reset can clear its memory and restore communication.
- For Battery-Powered Units: Remove the faceplate, take the batteries out, and install them backward for 10 seconds. Then, reinstall them correctly. This drains any residual charge in the capacitors and forces a hard reboot.
- For Hardwired/Smart Units: Many smart thermostats have a physical reset button or a reset option within their settings menu. Alternatively, you can turn off the HVAC circuit breaker for 60 seconds and turn it back on to power-cycle the device.
- Check Calibration: If your thermostat is running but the house feels much warmer than the display indicates, the internal sensor may be out of calibration. Place a standalone thermometer right next to the thermostat for 15 minutes. If there is a discrepancy of more than 2 degrees, your thermostat may need to be recalibrated or relocated away from drafts and direct sunlight.
Signs Your Thermostat Is Faulty and Needs Replacement
If you have gone through all the troubleshooting steps and your AC still will not respond, the thermostat itself may have reached the end of its operational lifespan.
While older analog thermostats (the classic round gold dials) are incredibly durable and can last up to 35 years because they rely on simple physical metal coils, modern digital and smart thermostats are complex microprocessors. They typically need to be replaced every 10 to 15 years due to software obsolescence, sensor drift, or internal component degradation.
If you are trying to decide whether to keep repairing your current setup or upgrade, our AC Repair vs Replace Decision Guide can help you weigh your options.
Here are the classic signs that your thermostat is faulty and needs to be replaced:
- The display is completely dead even after installing brand-new batteries.
- The thermostat loses its programmed settings or connection to your Wi-Fi network constantly.
- The temperature readings fluctuate wildly, or the sensor reads the room temperature as significantly hotter or colder than it actually is.
- The physical buttons or touchscreen are unresponsive to your touch.
- The AC short-cycles (turns on and off rapidly every few minutes), which can quickly burn out your compressor.
Comparing Thermostat Types
| Thermostat Type | Average Lifespan | Key Features | Best Suited For |
|---|---|---|---|
| Analog / Mechanical | 25 to 35 Years | No batteries required; simple manual slider; highly durable. | Homeowners who prefer absolute simplicity and do not want programmable schedules. |
| Digital / Programmable | 10 to 15 Years | Digital screen; daily/weekly scheduling; battery backup. | Homeowners looking for basic energy savings by setting temperature setbacks while away. |
| Smart / Wi-Fi | 8 to 12 Years | Smartphone control; geofencing; energy reports; learning algorithms. | Homeowners wanting maximum energy efficiency, remote access, and integration with home automation. |
Frequently Asked Questions About a Thermostat Not Responding to AC Settings What to Check
Why is my thermostat not responding to ac settings what to check when the screen is blank?
A completely blank thermostat screen almost always points to a total loss of power. First, replace the batteries. If the screen remains blank, check your home's main electrical panel for a tripped breaker.
Next, check the safety switch on your indoor furnace or air handler blower door; if that door panel is even slightly loose, a safety switch will depress and cut all power to the thermostat. Finally, check for a blown low-voltage fuse on the indoor unit's control board.
Can a clogged drain line make my thermostat seem unresponsive?
Yes, absolutely. This is one of the most common "hidden" culprits we see in the Antelope Valley.
When your AC's condensate drain line becomes clogged with dust or algae, water backs up into the drain pan. This triggers the condensate safety float switch, which instantly cuts the 24V power supply to your thermostat or your AC's contactor to prevent indoor water damage. Clearing the clog will reset the switch and restore your thermostat's control.
How do I know if my thermostat is bad or if the AC won't turn on?
The easiest way to tell is by performing a fan test. Go to your thermostat and switch the fan setting from "Auto" to "On." If the indoor fan turns on and blows air, your thermostat is successfully communicating with the indoor unit, meaning the thermostat has power.
If the fan works but the outdoor unit will not start when you switch to "Cool," the issue is likely a safety lockout, a tripped outdoor breaker, a bad capacitor, or a failed contactor. If you are located in the Santa Clarita area and your system is completely unresponsive, read our expert guide on AC Won't Turn On Solutions Santa Clarita for more localized help.
Conclusion
A thermostat that refuses to respond to your AC settings can quickly turn your home into an uncomfortable environment. Fortunately, by systematically working through these five troubleshooting steps—checking your batteries, verifying your settings, resetting your breakers, inspecting your air filter and drain lines, and looking closely at your wiring—you can resolve the vast majority of thermostat communication issues on your own.
However, if you have tried these steps and your system still refuses to blow cold air, it is time to call in the professionals. Since 1996, our family-owned team at Affordable Air and Heating has kept families comfortable across the Antelope Valley, including Palmdale, Lancaster, Santa Clarita, and the surrounding communities. We pride ourselves on offering energy-efficient solutions, honest advice, and flexible financing options to fit any household budget.
Do not spend another hot afternoon sweating indoors. If you need expert diagnostic help, contact us today to schedule your professional service call.
Ready to restore comfort to your home? Visit our Air Conditioning Services Page to book an appointment with our experienced technicians today!